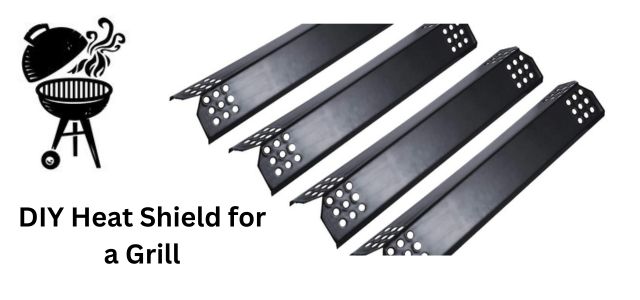
Nothing compares to the delicious flavor of grilled food. If so, you know why a grill heat shield might be necessary. Grill burners frequently run at high temperatures, and because they are located at the bottom of the rack, they are exposed to the drippings produced during meat grilling.
These drips may corrode the burners, shortening their life and decreasing efficiency. You have every justification for needing a grill heat barrier as a result.
Creating a heat shield for a grill is easy if you have the necessary tools and know what to do. This article will describe how to construct a grill heat shield. To make the process as simple as possible, we’ll provide a list of required materials, instructions, safety precautions, and maintenance advice. So what are you waiting for? Let’s start with how to make a heat shield for a grill.
Why You Need a Heat Shield for a Grill
Understanding why a heat shield is essential for a grill enhances the importance of this project. A grill heat shield serves several vital functions: it protects the burners from corrosive drippings, ensures even heat distribution, and reduces flare-ups, ensuring your food is cooked perfectly every time. Knowing how to make a heat shield for a grill not only extends the life of your grill but also improves the quality of your grilling experience.
How to Make a Heat Shield for a Grill
The procedure to be followed when making a heat shield for a grill is as follows:
1. Cleanup
Take the grill outside first, remove the plate, and clean it with detergent and water because the stainless steel grill needs some thorough cleaning. For light cleaning, you can also use vinegar to make it cleaner, and a soft cloth dipped in soap to remove any debris delicately.
Remember to give it a good rinse to get rid of any soap residue that can compromise the effectiveness of your protection. If the grime is particularly persistent, heat shields can be cleaned with industrial cleaners.
2. Verify the Dimensions
A measuring tape or a ruler can determine the burner’s length, height, and width. Ensure your heat shield is the ideal size to cover the burner completely. Your heat shield will evenly disperse heat in this manner.
3. Cut your Supplies
Using a grinder with a metal cutting disc or other steel cutting tools, mark, measure, and cut out your materials. Remember to trim the measurements precisely.
4. Bend the Steel
After cutting the materials, bend the steel to the desired shape while holding it in a vice and using multi grips or another tool. If the steel is very tough, a hammer can be used to assist in shaping it.
5. Create the Required Holes
Use a drill to make holes in the grill’s sides. Because you will screw your shield onto the holes, remember to keep a good spacing between them.
6. Put the Shield on Your Grill
Use water or vinegar to clean your new heat shield, then dry it and position it correctly on the grill. Remember to verify whether the burner is adequately covered. You must create a new heat shield from scratch if it doesn’t.

7. Install the Heat Shield.
Screw the heat shield into place after you’ve placed it. It is simple to unscrew when you wish to clean it. Thus, it is wise to avoid direct welding.
The Purpose of a Heat Shield
A heat shield’s thickness varies and is typically constructed of metal.
- Prevent flare-ups that can burn your food, and might be dangerous sometime.
- It can keep fats and oils from contacting the burners, extending their lifespan.
- It helps to extend the life of your gas grill burners because the lipids from your meat will eventually clog them up.
Factors to Consider When Making a Homemade Heat Shield for a Grill
While creating a handmade heat shield, there are various factors to watch out for to ensure good operation. They comprise
Endurance
Heat shields are designed to be used around a blazing fire. These flames’ heat causes energy to be released and expansions, which could weaken the metal rods. Also, specific recipes require some power to heat or stir during the cooking process.
The heat shield can be harmed if they are unstable during these times. To withstand all actions on the heat shield, the stands that support the entire cooking system with a heat shield must be strengthened.
Spread of Heat
Heat shields should be created for outdoor grills to fit the usage environment. The best action in this situation is to ensure that the heat or temperature on the shield is dispersed evenly.
The variety of weather and temperatures needed to prepare food properly should result in something other than leakage from heat loss on one side or several sides while a part is receiving more excellent heat.
Volume of Temperature
Many foods cook at various temperatures. For this reason, it is crucial to consider temperature regulators like temperature volume when creating a DIY heat shield. When you require low heat to cook your food, you can use this aspect of heat regulation to lower the temperature so that your heat shield doesn’t get too hot.
Environmental Sensitivity
People from various groups stay in particular parts of the setting and behave in multiple ways. Those who live in places that are frequently wet, windy, or covered with snow may need to employ heat shields. For instance, the heat shield cools down more quickly in windy conditions than in still states.
Hence, you should ensure that your heat shields may be used in various settings while creating them. More solutions can be required for heat shields impacted by multiple weather conditions.
Follow the Safety Directions
It’s wise to adhere to specific fundamental safety considerations when creating a BBQ grill heat shield.
While creating your grill barrier, wear the proper safety gear, such as ear muffs, gloves, and protective eyewear. Safety welding goggles are needed to prevent steel fragments from entering your eyes when cutting the metal.
Second, while working on the project, ensure the grill is excellent. Give it enough time to cool off if it’s hot before working on it. The materials should also be cut on a flat surface, such as concrete or a welding table. Ensure the heat source and your heat shield are not directly connected.
Finally, avoid putting your heat shield on top of the metal.
Advantages of a Grill Heat Shield
- In contrast to rock, heat shields are open and straightforward to clean. Thus they do not support microbial growth, especially molds.
- They are compact and lightweight, so they are simple to travel and won’t damage your gas or charcoal barbecue.
- Heat shields are simple to replace because the materials are affordable and accessible. They can flavor and evaporate cooking drippings.
- They are safe for use with both gas and charcoal grills.
- Heat shields are made of inexpensive, dependable materials that may be found in most hardware stores. Hence, if any component collapses, it is simple to replace it.
- Heat shields take in heat and evenly distribute the heat across the grill’s surface. This keeps the food from cooking unevenly, evaporates drippings, and enhances the flavor.
Conclusion
By following this guide on how to make a heat shield for a grill, you can enhance your grilling experience. A homemade grill heat shield is simple to construct, use, and maintain. The materials required are affordable and easily accessible, making it a practical addition to your grilling setup. Remember to follow safety precautions and maintain your heat shield properly for the best results. Enjoy your enhanced grilling experience with your new grill heat shield!

